
Implementasi VLAN dengan Dua MikroTik (Router dan Switch)

Praktik VLAN dengan dua MikroTik: MikroTik 1 sebagai router utama (VLAN, DHCP, Wi-Fi, hotspot, NAT) dan MikroTik 2 sebagai switch VLAN.
Daftar isi
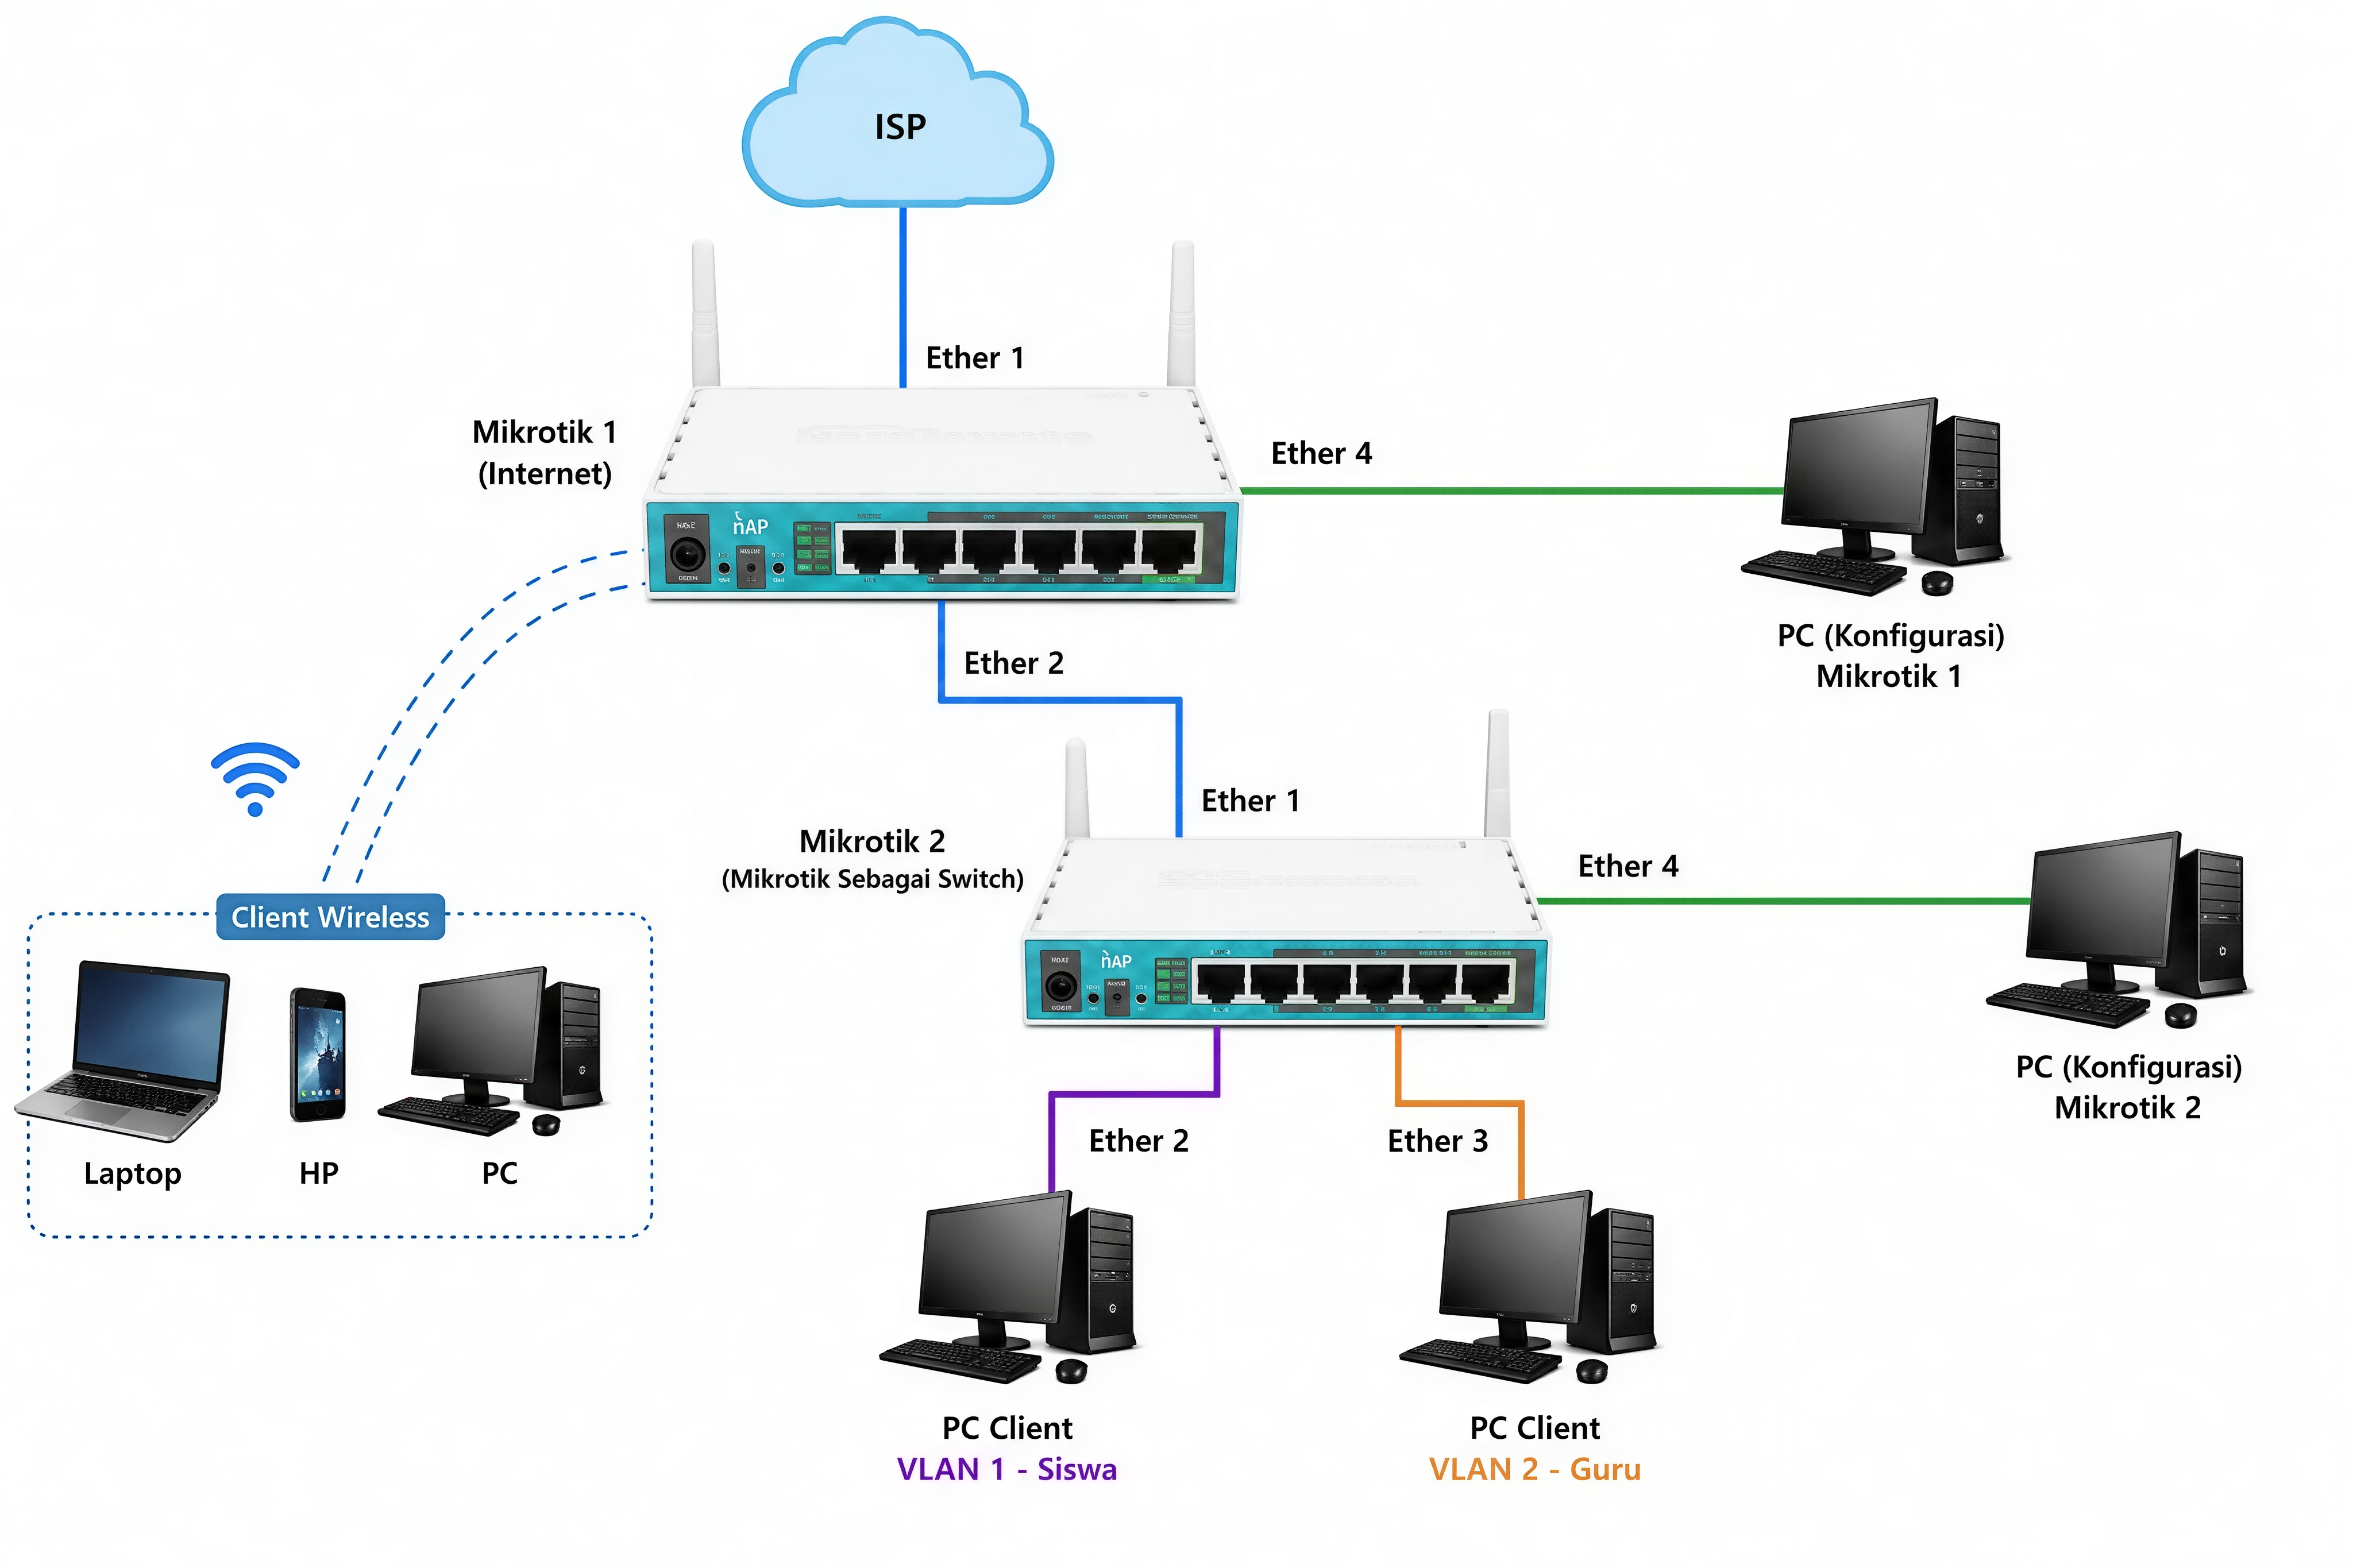
A. Topologi jaringan
Praktik ini memakai dua perangkat MikroTik. MikroTik 1 bertugas sebagai router utama (VLAN, DHCP, Wi-Fi, hotspot, NAT), sedangkan MikroTik 2 dipakai sebagai switch yang meneruskan VLAN ke PC client.
| Perangkat / Port | Terhubung ke | Keterangan |
|---|---|---|
| ISP | ether1 MikroTik 1 | Sumber internet |
ether4 MikroTik 1 | PC Admin | Untuk konfigurasi via Winbox |
ether2 MikroTik 1 | ether1 MikroTik 2 | Jalur trunk (membawa VLAN 10 dan 20) |
ether2 MikroTik 2 | PC Client | VLAN 10 (siswa) |
ether3 MikroTik 2 | PC Client | VLAN 20 (guru) |
| Segmen | VLAN ID | Jaringan |
|---|---|---|
wlan1 (hotspot) | - | 192.168.20.1/24 |
vlan1-siswa | 10 | 192.168.40.1/24 |
vlan2-guru | 20 | 192.168.60.1/24 |
B. Konfigurasi MikroTik 1 (Router utama dan wireless)
1. Bersihkan semua konfigurasi
- Klik
System→Reset Configuration. - Centang No Default Configuration.
- Klik Apply → OK.
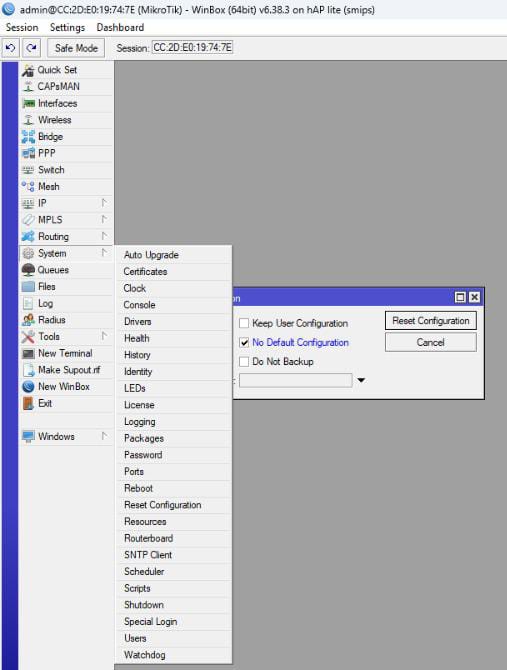
2. Berikan identitas pada MikroTik 1
- Klik
System→Identity. - Masukkan nama
Wifi Routerboard. - Klik Apply → OK.
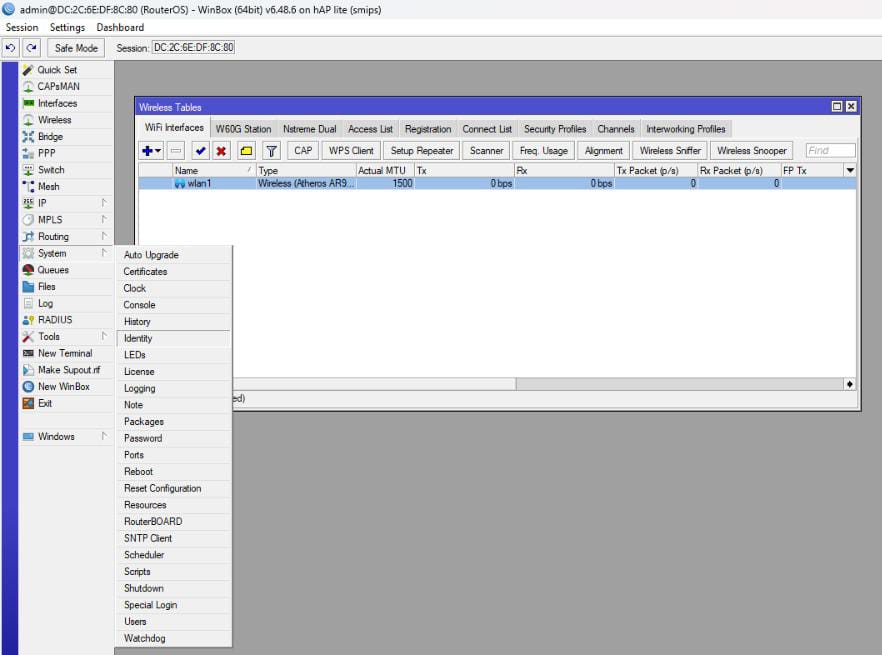
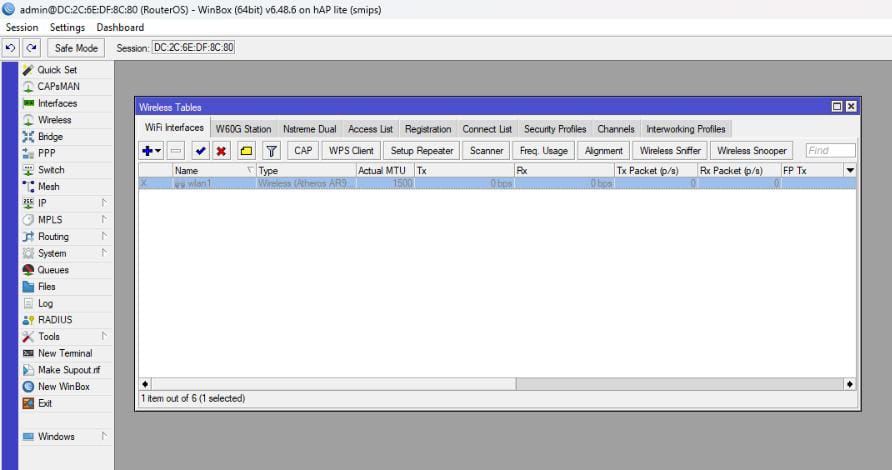
3. Nyalakan wireless
- Masuk ke menu
Wireless. - Klik
wlan1satu kali. - Klik ikon centang biru (✓) untuk mengaktifkannya.
4. Membuat VLAN 10 dan 20
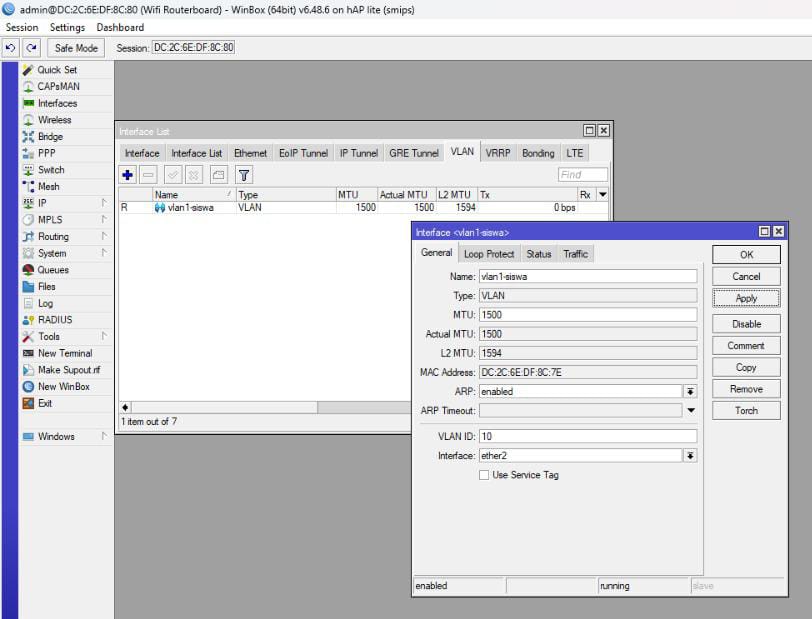
Buat dua interface VLAN di atas ether2 (jalur menuju MikroTik 2).
- VLAN siswa: klik
Interface→ tabVLAN→ klik +.- Name:
vlan1-siswa - VLAN ID:
10 - Interface:
ether2 - Klik Apply → OK.
- Name:
- VLAN guru: klik + lagi.
- Name:
vlan2-guru - VLAN ID:
20 - Interface:
ether2 - Klik Apply → OK.
- Name:
5. Memberi MikroTik internet dari ISP
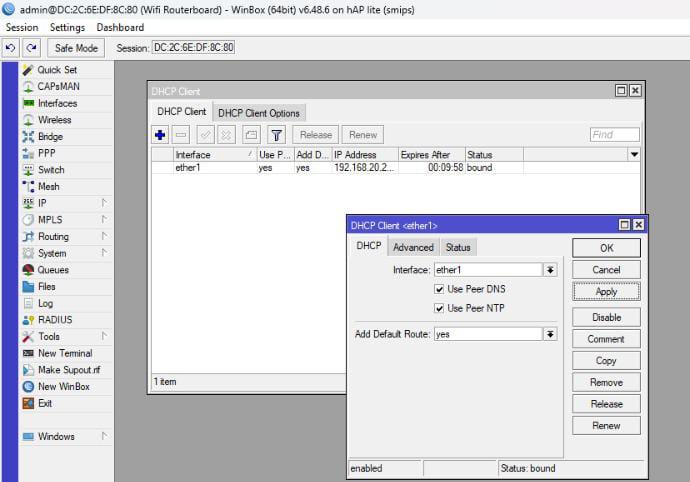
- Klik
IP→DHCP Client→ klik +. - Interface:
ether1. - Klik Apply → OK.
6. Memberi IP address pada WLAN dan VLAN
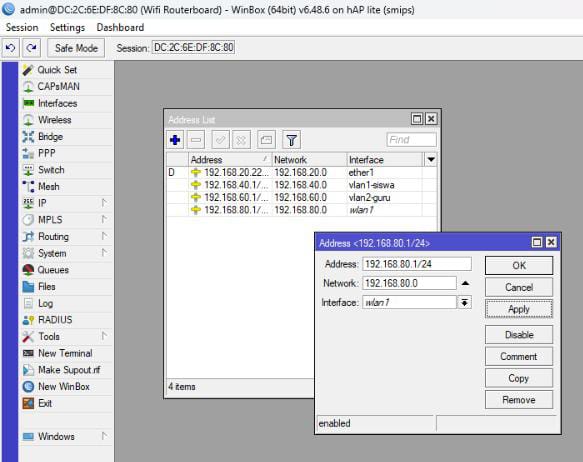
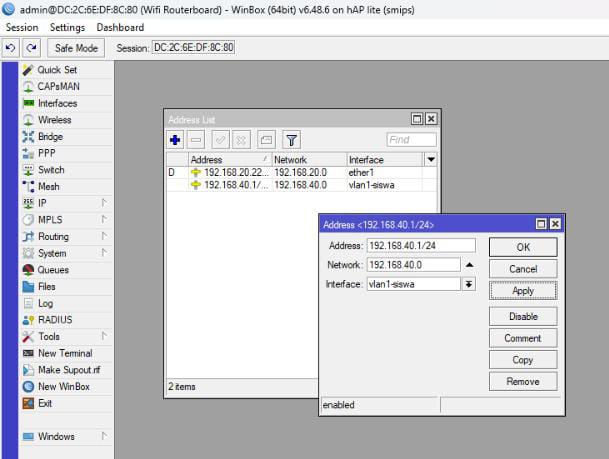
Klik IP → Addresses → klik +, lalu buat tiga alamat berikut satu per satu:
| Interface | Address |
|---|---|
wlan1 | 192.168.20.1/24 |
vlan1-siswa | 192.168.40.1/24 |
vlan2-guru | 192.168.60.1/24 |
Setiap alamat diakhiri dengan klik Apply → OK.
7. Memberi DHCP Server pada WLAN dan VLAN
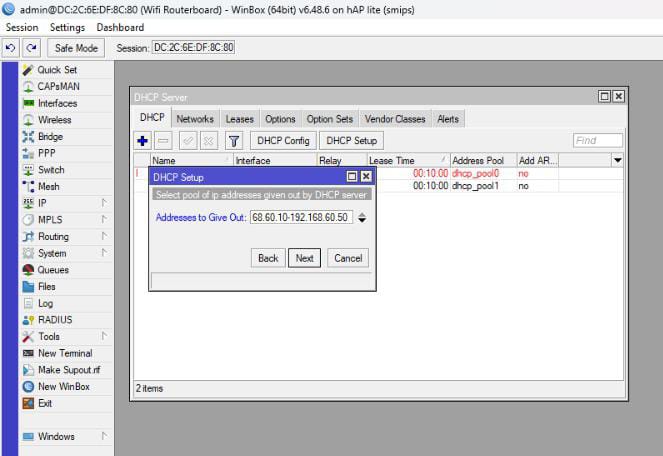
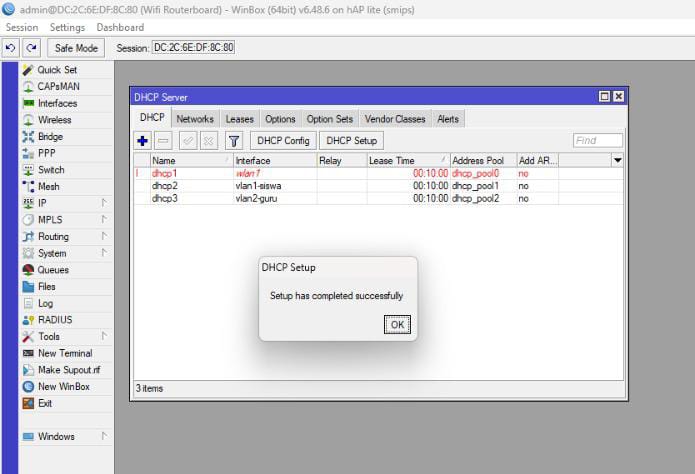
Klik IP → DHCP Server → DHCP Setup, lalu ulangi untuk tiga interface berikut:
| Interface | Address to Give Out |
|---|---|
wlan1 | 192.168.20.10-192.168.20.50 |
vlan1-siswa | 192.168.40.10-192.168.40.50 |
vlan2-guru | 192.168.60.10-192.168.60.50 |
Pada setiap wizard, klik Next sampai selesai.
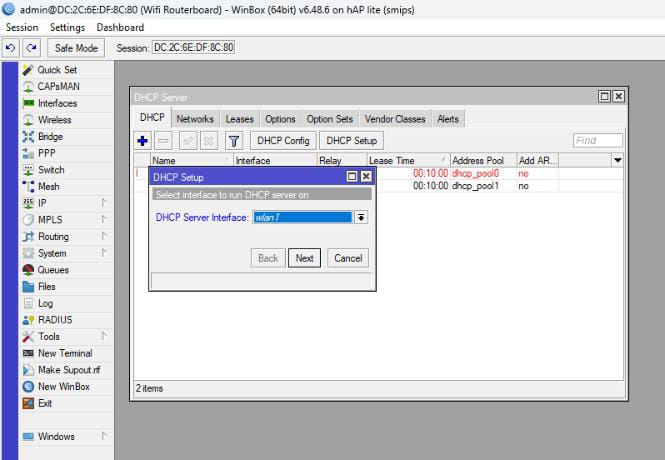
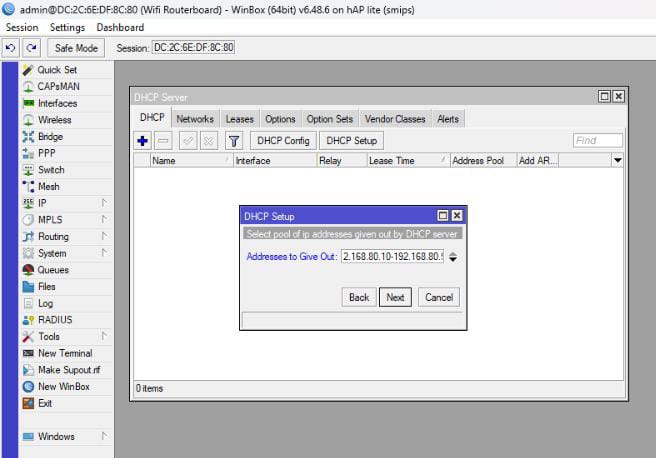
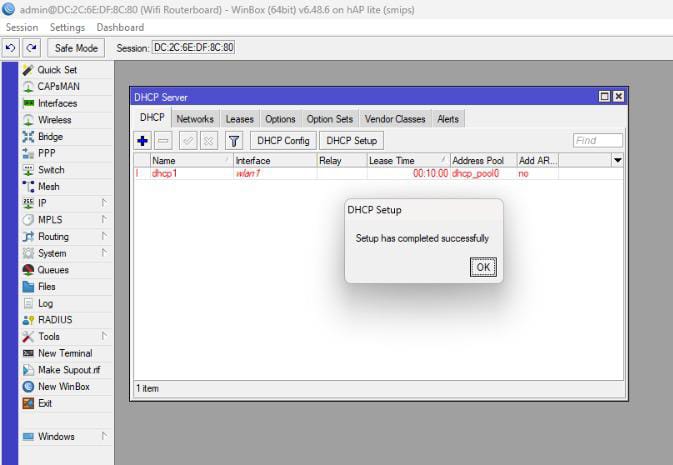
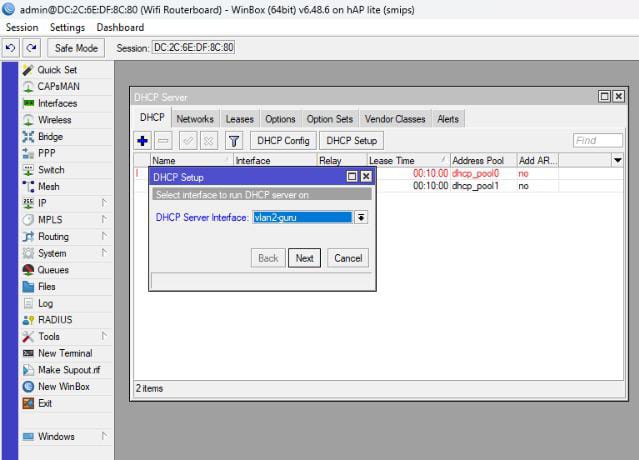
8. Konfigurasi WLAN
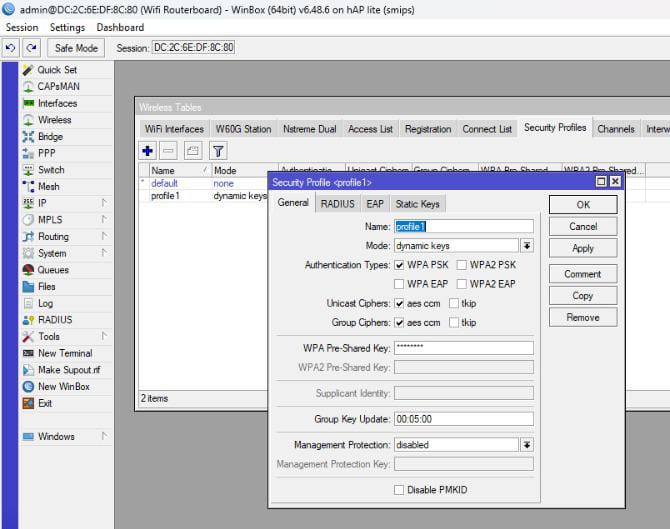
- Membuat Security Profile (password): klik
Wireless→ tabSecurity Profiles→ klik +.- Name:
profile1(contoh) - Mode:
dynamic keys - Authentication Types:
WPA PSK - WPA PSK (Pre-Shared Key):
12345678(password Wi-Fi) - Klik Apply → OK.
- Name:
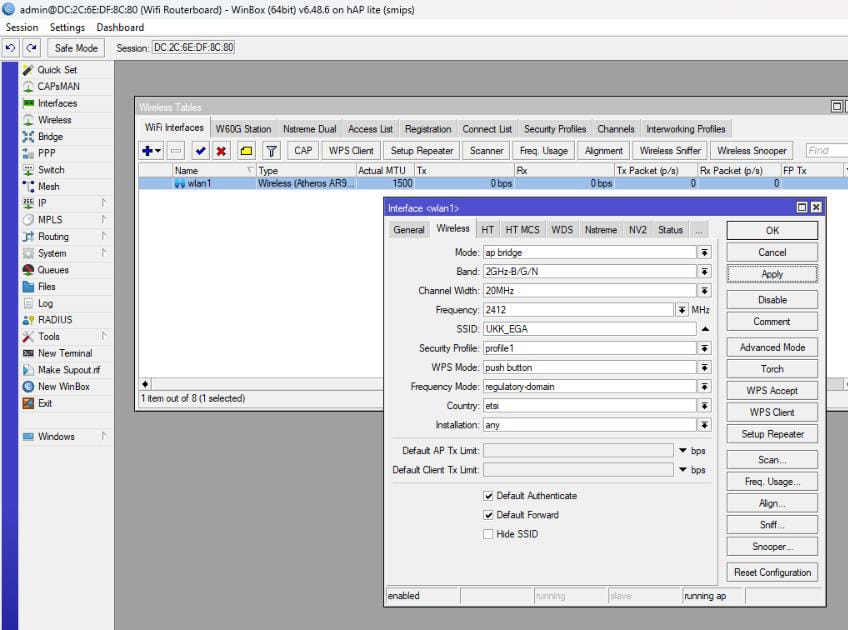
- Mengatur wlan1: klik
Wireless→ tabWiFi Interfaces→ klik dua kaliwlan1.- Mode:
ap bridge - Band:
2GHz-B/G/N - SSID:
UKK_7(format UKK_NoAbsen) - Security Profile:
profile1(yang tadi dibuat) - Klik Apply → OK.
- Mode:
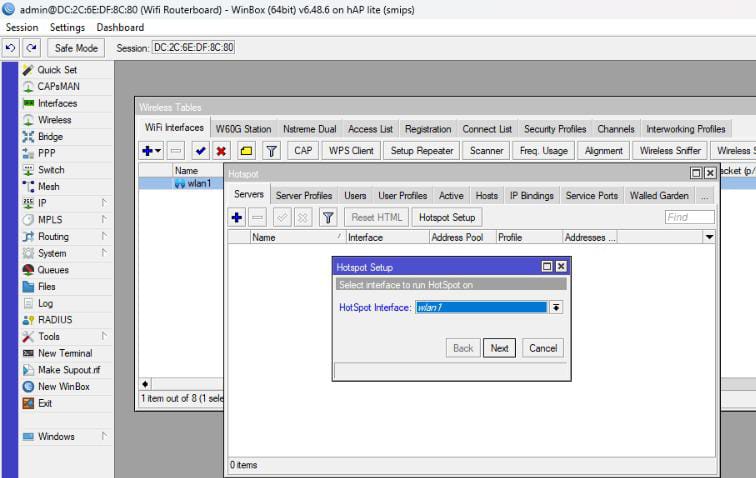
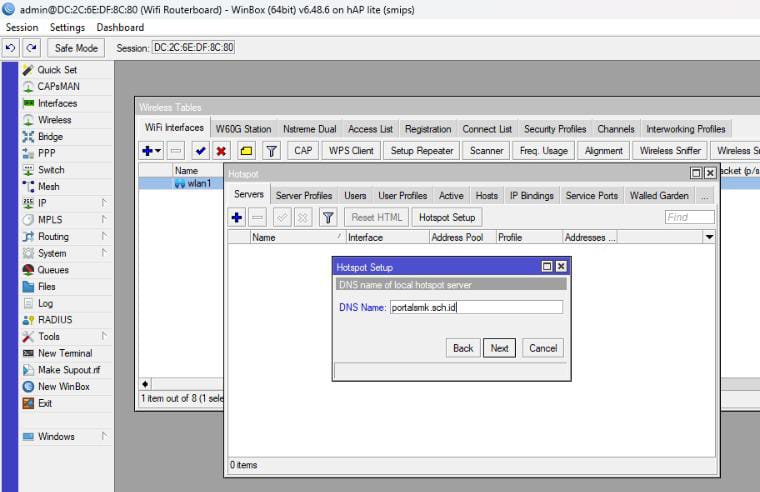
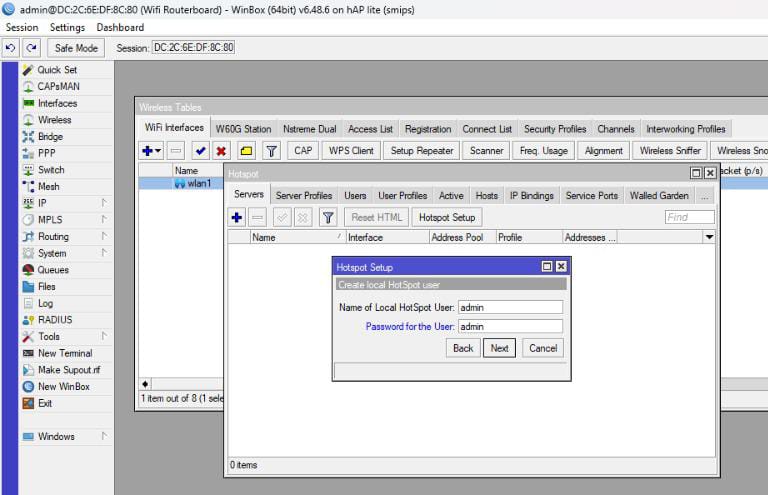
9. Konfigurasi Hotspot
- Membuat server hotspot: klik
IP→Hotspot→ tabServers→ Hotspot Setup.- Interface:
wlan1 - DNS Name:
portalsmk.sch.id - Username:
admin - Password:
admin - Klik Next sampai selesai.
- Interface:
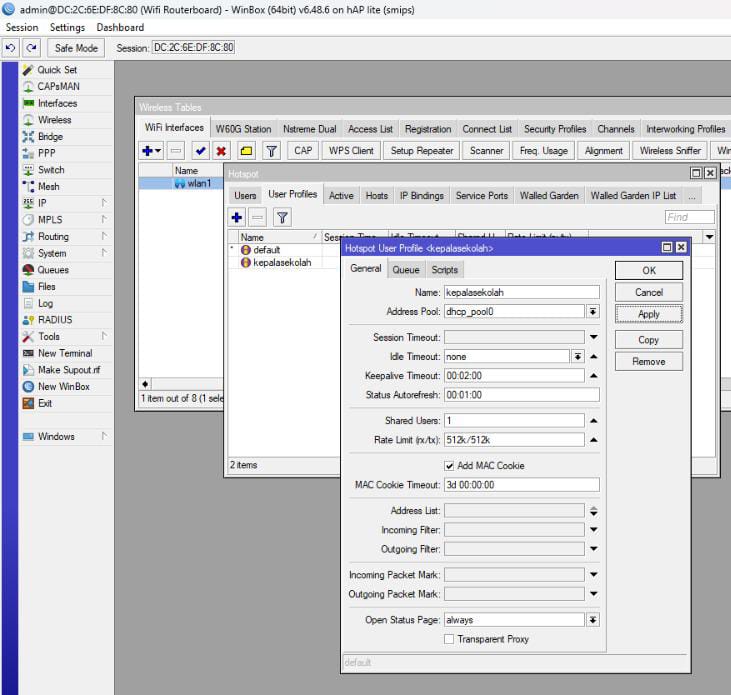
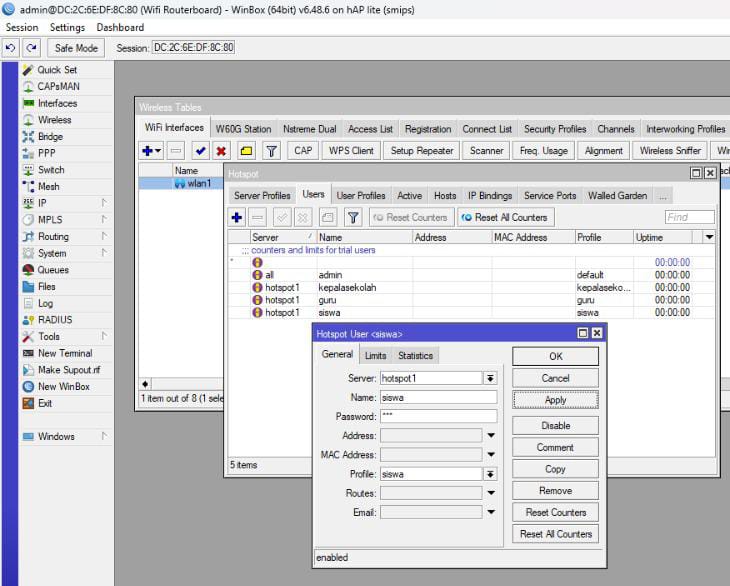
- Membuat User Profiles (tab
User Profiles→ +), tiga profil berikut:Sesuaikan Address Pool dengan pool DHCP wlan1 milik Anda (lihat diName Address Pool Rate Limit (rx/tx) kepalasekolahdhcp_pool0512k/512kgurudhcp_pool0256k/256ksiswadhcp_pool0128k/128kIP→Pool). Klik Apply → OK. - Membuat Users / voucher (tab
Users→ +), tiga akun berikut dengan Serverhotspot1:Name Password Profile kepalasekolah123kepalasekolahguru123gurusiswa123siswa
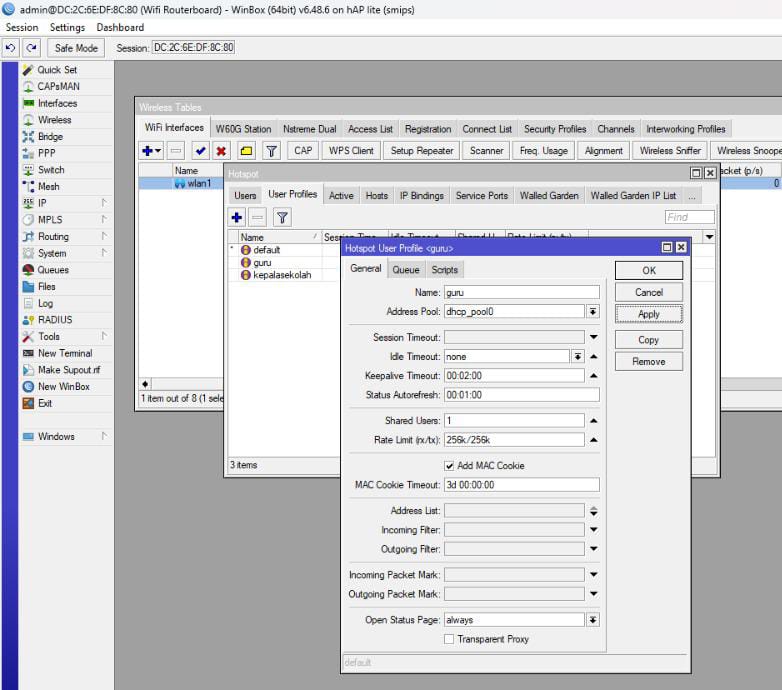
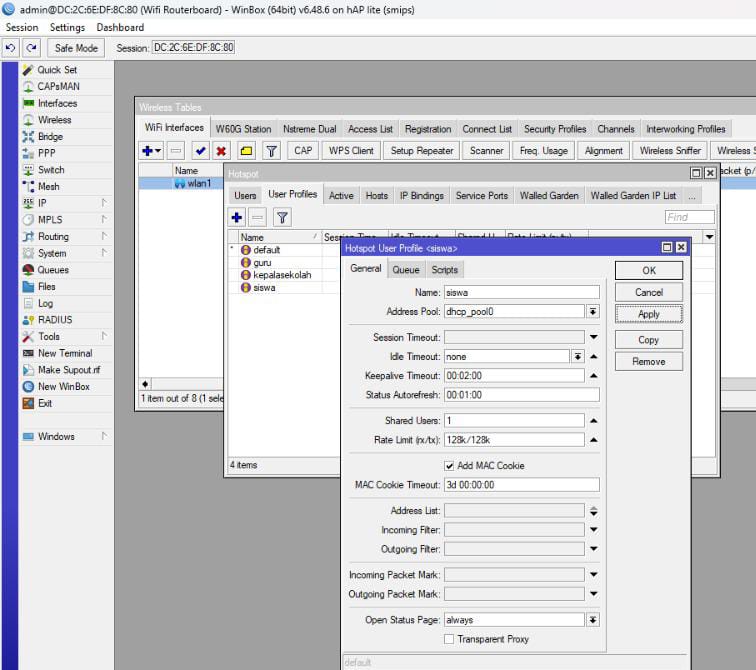
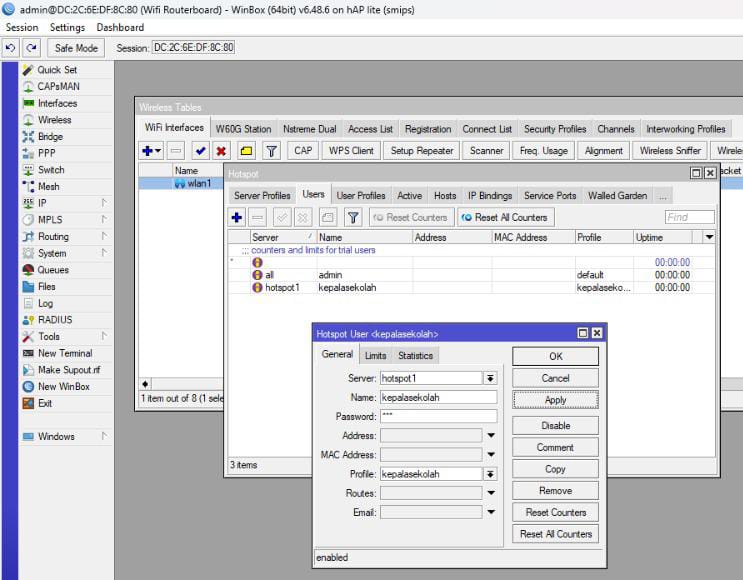
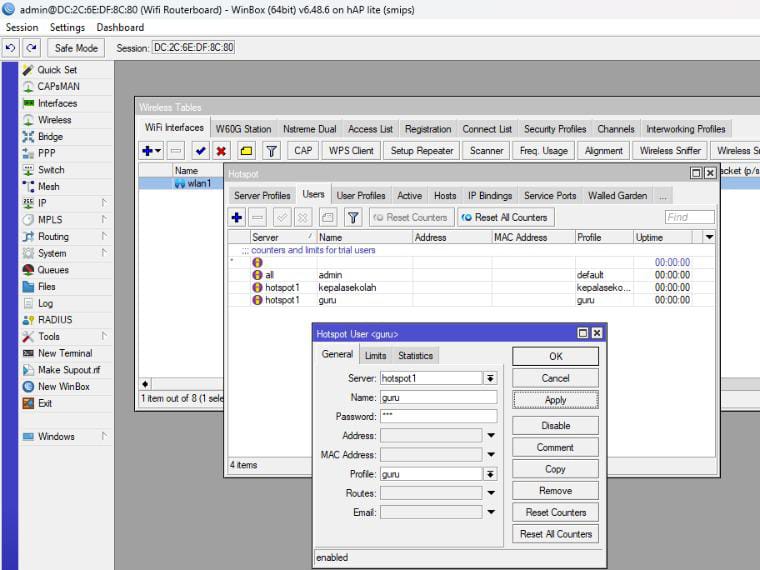
123 dan admin hanya contoh latihan. Untuk pemakaian nyata gunakan password yang kuat dan unik.10. Konfigurasi NAT
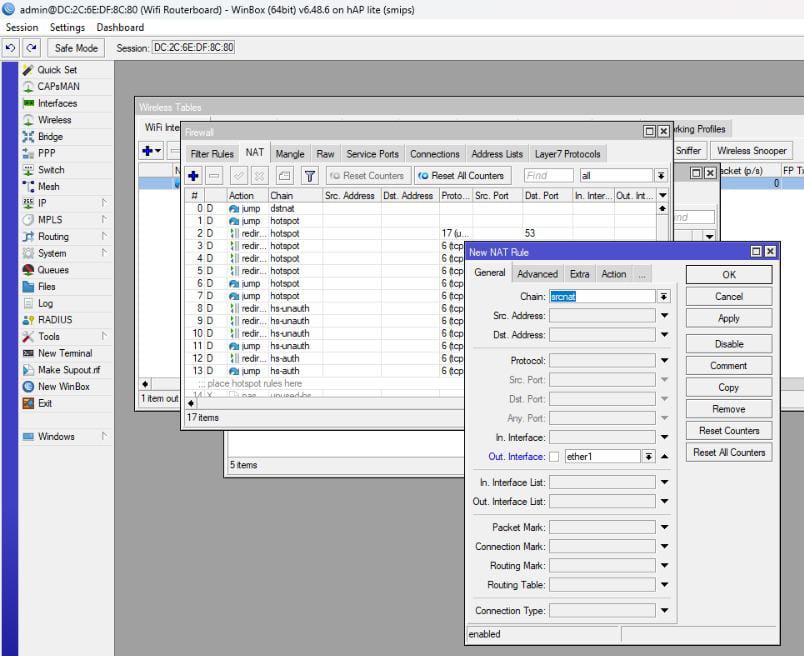
- Klik
IP→Firewall→ tabNAT→ klik +. - Tab General: Out. Interface =
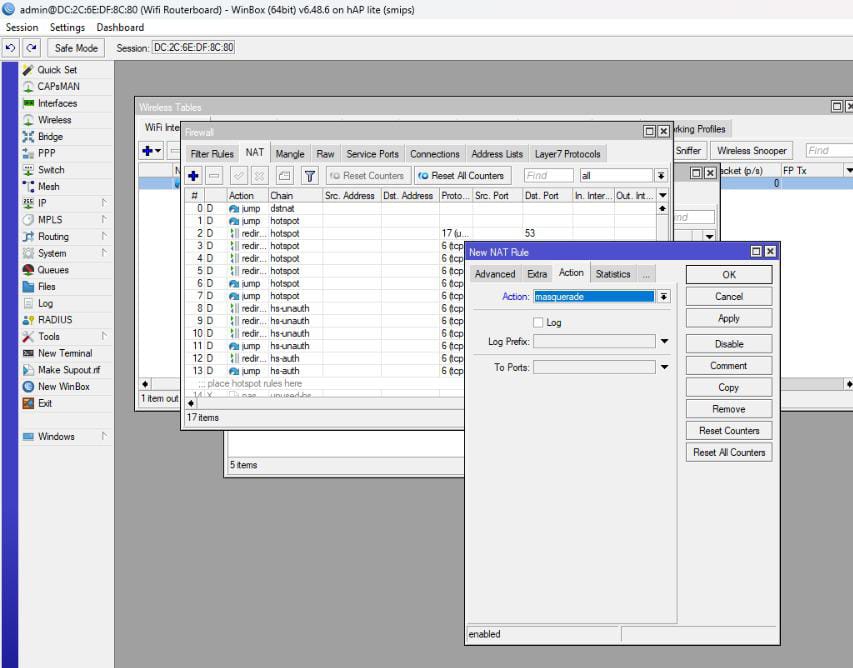
ether1. - Tab Action: Action =
masquerade. - Klik Apply → OK.
C. Konfigurasi MikroTik 2 (Router sebagai switch)
MikroTik 2 tidak mengatur IP; perangkat ini hanya menjadi switch yang meneruskan VLAN 10 dan 20 dari MikroTik 1 ke port client.
1. Bersihkan semua konfigurasi
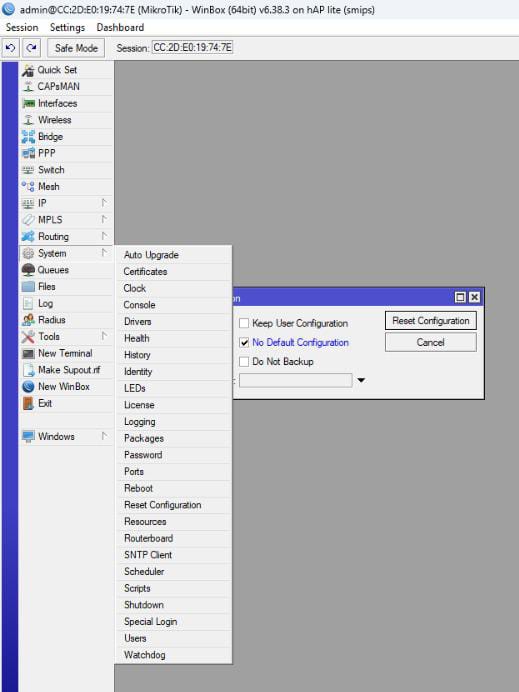
- Klik
System→Reset Configuration. - Centang No Default Configuration.
- Klik Apply → OK.
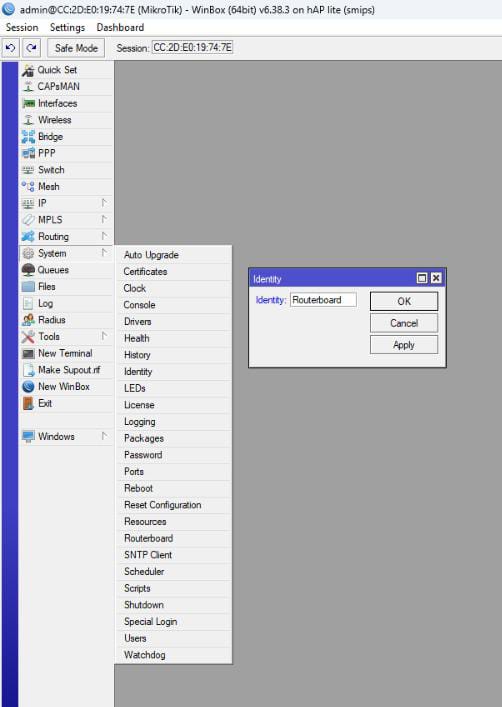
2. Berikan identitas pada MikroTik 2
- Klik
System→Identity. - Masukkan nama
Routerboard. - Klik Apply → OK.
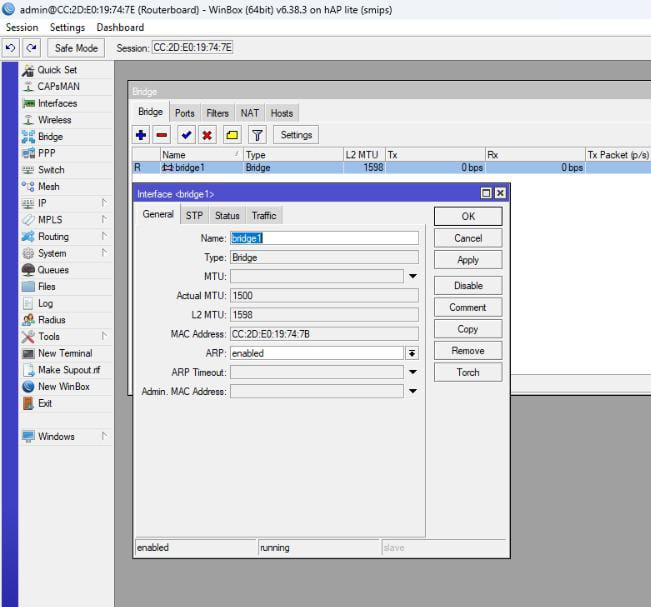
3. Tambahkan bridge
- Klik
Bridge→ tabBridge→ klik +. - Klik Apply → OK.
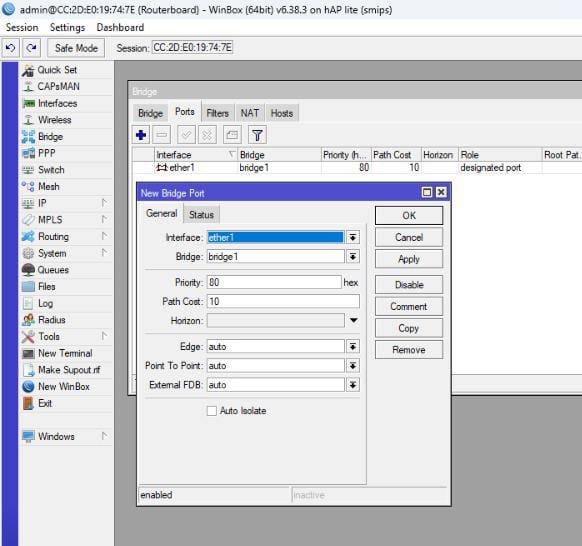
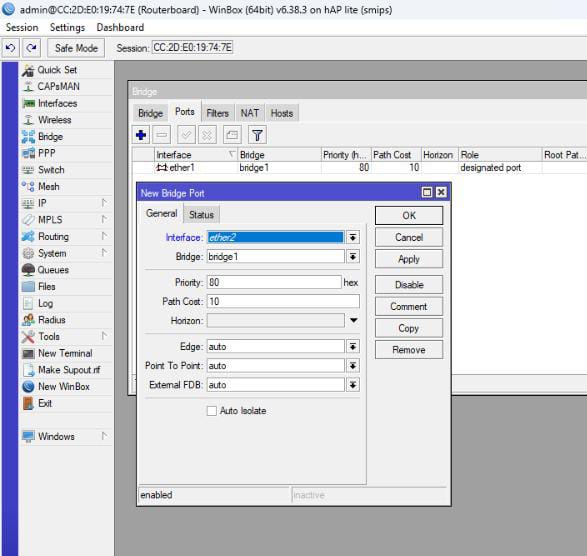
4. Tambahkan port bridge
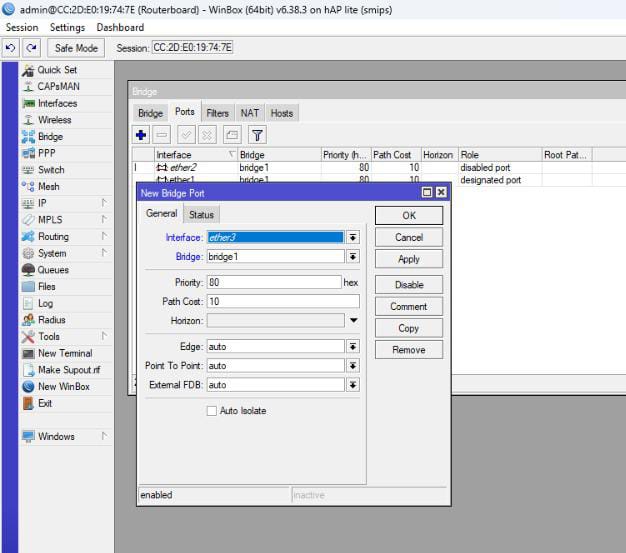
Klik Bridge → tab Ports → klik +, lalu tambahkan ether1, ether2, dan ether3 satu per satu (masing-masing diakhiri Apply → OK).
5. Menambahkan Switch VLAN
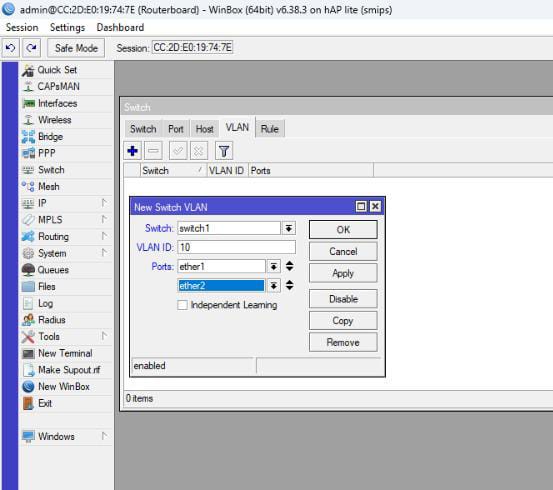
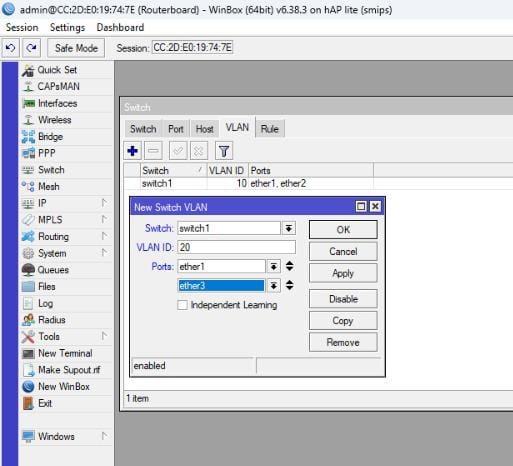
Klik Switch → tab VLAN → klik +, lalu buat dua entri:
| Switch | VLAN ID | Ports |
|---|---|---|
switch1 | 10 | ether1, ether2 |
switch1 | 20 | ether1, ether3 |
6. Atur port switch
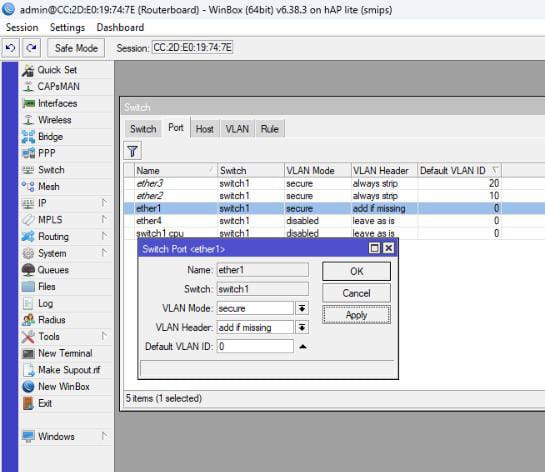
Klik Switch → tab Ports, lalu klik dua kali tiap port:
| Port | Peran | VLAN Mode | VLAN Header | Default VLAN ID |
|---|---|---|---|---|
ether1 | Trunk | secure | add if missing | - |
ether2 | Access VLAN 10 | secure | always strip | 10 |
ether3 | Access VLAN 20 | secure | always strip | 20 |
Setiap port diakhiri dengan klik Apply → OK.
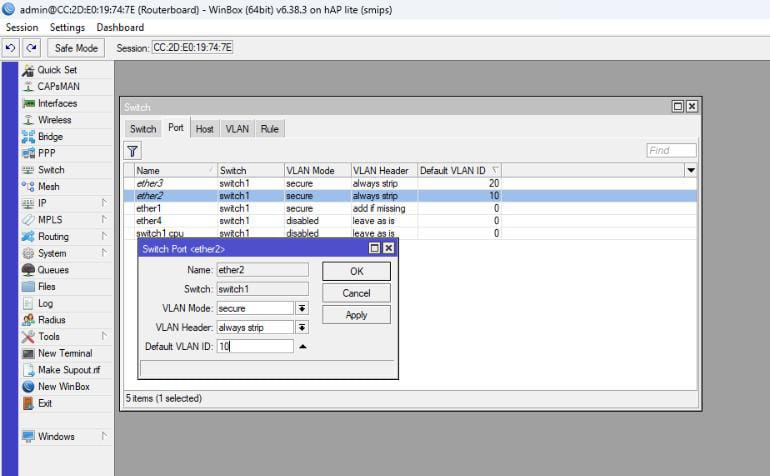
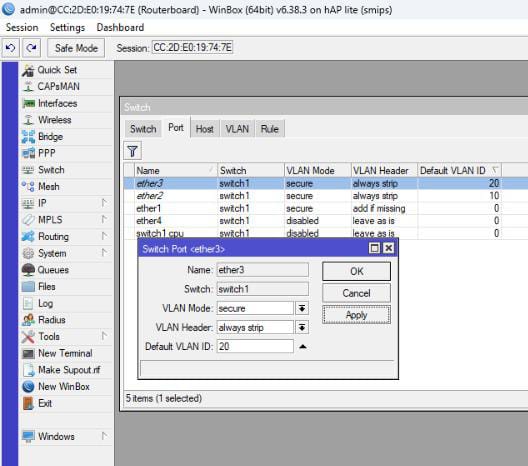
Switch hanya tersedia pada perangkat MikroTik yang memiliki chip switch (misalnya seri hAP/RB951). Pada perangkat lain gunakan bridge VLAN filtering.Hasil pengujian dan verifikasi
- Hubungkan PC client ke
ether2MikroTik 2, lalu pastikan mendapat IP dari192.168.40.10-50(VLAN siswa). - Pindahkan kabel ke
ether3MikroTik 2, lalu pastikan mendapat IP dari192.168.60.10-50(VLAN guru). - Hubungkan HP ke SSID
UKK_7, buka browser, lalu login portal hotspot dengan salah satu akun voucher. - Uji
ping google.comdari tiap client untuk memastikan NAT berjalan.